
Just want to learn Audacity? Click here.
New student: read ALL the “install” and “record” tabs. Expect to spend not much more than $300 if just starting.
- Recommended Equipment: 🎤 Mic .. ⚡ Mixer .. 🔌 Cable .. 🔊 Acoustic Panels .. 🎧 Parts
- Home Studio Setup: Use pillows and a reach-in closet as shown at Pillow Fort Studios
- How To Record: 🎤 Learn to Record .. 🎧 Audacity .. 🔊 Better Sound ..⚡ Mixer
Equipment from us is for students only—not available to the public. First paid first served. Be in touch by email, text, phone or PM to schedule if you are picking up (just West of Minneapolis).
Scroll down to read what equipment we recommend, and how to set it up.
We provide a variety of individual help and support to our students.
We can remote connect to help you with recording or computer issues, evaluate your home studio from pictures, or even take a walkaround through your home studio with our augmented reality app! Click a tab above to get started.
📌 Recommended Equipment:
Next Step: Home Studio Setup
Scroll down to learn how to get started, or click one of these links:
- Home Studio Setup: 🔨 Choose Your Studio .. 🔩 Stand+Arm .. 🎤 Mic+Mixer .. Vertical Supports
- How To Record: 🎤 Learn to Record .. 🎧 Audacity .. 🔊 Better Sound ..⚡ Mixer
Want live help? Click the tab above to get the live augemented reality video app.
Ready to start your home studio space?
Start by sending us FOUR pictures. Take a picture from behind the mic looking out (#1), and one from a distance away looking in (#2). We need to see the whole room. Take a picture of your mixer and microphone as well (#3 and #4) showing how your microphone is mounted, and how the microphone cable is routed.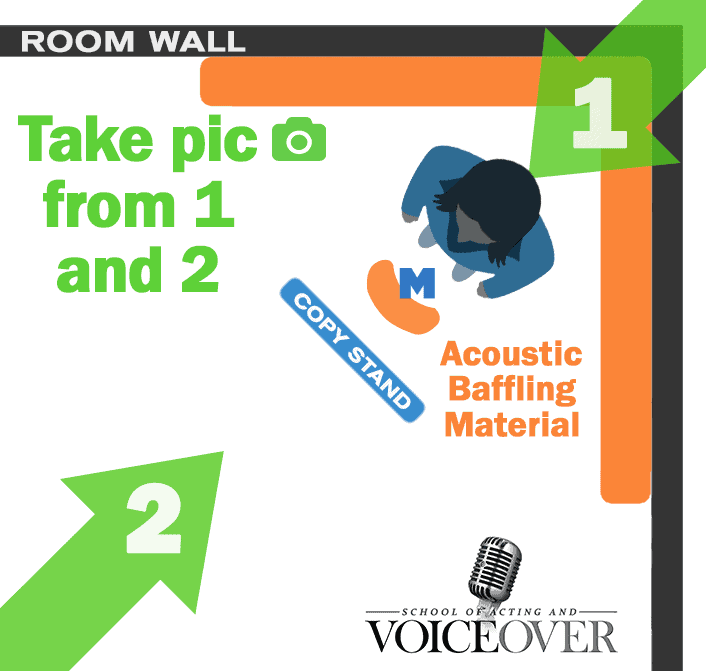
For Audacity or your Computer:
Request to schedule tech support help from your coach during a session, or by email or text, and they will send you a code to enter below. They will remote connect to your computer and assist you.
For Mac Users:
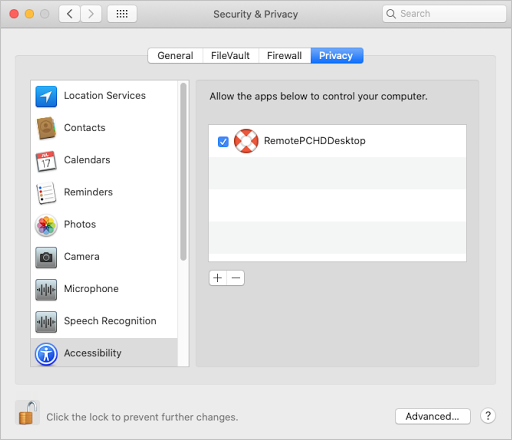
You may need to authorize the HelpDesk application. Mac OS Catalina requires user permission for applications to access privacy sensitive data. Hence you need to grant accessibility permissions to HelpDesk. To authorize Helpdesk:
- Open System Preferences and go to ‘Security & Privacy’ pane.
- Select ‘Accessibility’.
- Click the lock
 and provide system authentication to allow changes.
 - Select the checkbox next to ‘RemotePCHDDesktop’.
Live video support: Download one of our augmented reality apps below, and we can draw right on your live video as we chat live with you to help you make changes to your studio setup:


Click any tab above to see recommended equipment. Prices vary (see our latest research), but contact us for this week’s lowest price deals that we’ve found around the web.
If you want to make your own acoustic baffles, we provide the instructions, but pillows are better dollar-for-dollar, and are nearly as good when comparing square footage as well.
🎧 Condenser Mic Specs
What are good specs?
Generally, only condenser mics are sensitive enough for voice over.
But VERY sensitive Condenser mics (with large diaphragms) pick up too much mouth and studio noise, and those with too smaller diaphragms pick up too little of the richness of the human voice.
25mm or larger are sometimes called LDC, meaning “Large Diaphragm Condenser” (the diaphragm is the membrane that vibrates in response to sound). Bigger than that is usually NOT better because of being TOO sensitive. Too much smaller usually means not sensitive enough.
Minimum standards for voiceover condenser mics are usually considered to be:
- Unidirectional condenser with narrow polar pattern, cardioid or super-cardioid.
- Diaphragm Size: 25mm or larger
- Self-noise: Less than 19dB-A (“Equivalent” noise)
Sensitivity between -43 and -32dB-A.
Sensitivity closer to zero (-31,-30,-29 etc.) will give you trouble with mouth noise. (Sensitivity range in mV/Pa — between 7 and 25, greater than 25 is a bit much).
Common specs:
- Self noise: 16dB-A
- Diaphragm: 25mm
- Sensitivity: -35dB
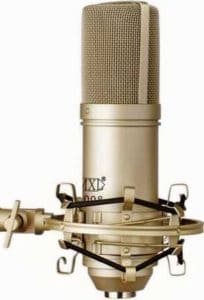
The LDC 26mm diaphragm Behringer B-1 has a low self noise of 13 dB(A) (excellent) and sensitivity of -34 (good, almost a bit much).
MXL: V67G•2001•2006•2008•V63M•992 • Behringer B1 • AT2020 • Sterling SP150
These are all professional Large Diaphragm Condenser (LDC) Microphones comparable to the Hogan Signature Series 1-A.
These mics are all recommended when priced under $100. Of the V67 series, only the 67/67G/V67GHE or V67P are recommended. The V67GS is NOT recommended. Many other microphones costing more (such as the V67i or Behringer B1 /specs) are also fine, but we are restricting our recommendation to these high-quality but low-cost mics. Many other LDC-type mics are also great for voiceover, like the Sterling SP150.
► What about Blue Yeti Microphones? This is a common question. Scroll down for more info.
Also, only the 992 is recommended, the similar 990 and 770 are NOT recommended. If you can’t find any of the other mics at good price, the V67M is also acceptable, but works best with a very quiet studio.
The 992 has very slightly the lowest self noise, which makes it slightly preferable. MXL is the brand name for pro audio gear made by Marshall Electronics. When comparing prices for yourself, pay attention to extras that are/are not sometimes included such as case (not needed), shock mount (somewhat needed) and pop filter (needed). You can always buy extras separately.
Current low price: around $80 each (tax, shipping and handling included). Pictured: MXL 2001/2006/2008.
Why these microphones?
Listen to comparisons of these mics by well-known voiceover engineer George Whittam to the famous $3,600 Neumann U87 and other famous voiceover mics.
Those audio comparisons, backed up by a bunch of research on my part, are the key reason why we recommend the MXL mics. They’re all based on Neumann!
- The MXL 2001/2006/2008/V67 circuit uses “negative feedback,” similar to the Neumann U87, to provide corrective EQ to the K67 capsule.
The MXL 2001 was one of the first inexpensive condenser microphones on the market. It mated a version of the Neumann K67 large-diaphragm capsule to a transformer-coupled amplifier circuit.
It’s K67-style capsule has an outside diameter of 32mm, intentionally dropping the size from Neumann’s original (34mm) to push the capsule’s resonant frequency higher in the audio spectrum.
Also, many of these MXL mics are private labeled by Guitar Center, Musician’s Friend, Music 123, and elsewhere. The MXL mics have the same internals, mostly only differing in in the shape of the body and headbasket; internally, they share the same circuit and capsule.
Next—About Other Microphones:
What About The Blue Yeti?
Almost any mic that you can set up to work while standing is fine for training, the Yetis included. Note that most Yetis do NOT easily attach to a standard arm or stand, but with some zip ties, tape or other tricks, you can make it work. The Blue Yeti Pro is passable for some kinds of voiceover. Any other Yeti you should plan to upgrade sooner rather than later.
With a Yeti, you are paying for a wide range of configuration possibilities (multiple mics/diaphragms inside), rather than for one higher-quality mic/diaphragm. Any Large Diaphragm Condenser (LDC) mic is better than any Yeti, but because LDC mics are more sensitive, you need a better home studio if you go with an LDC mic.
For that reason, we often tell talent who already have a Yeti that we’re fine if they want to wait to upgrade to an LDC mic until they are making money, but that they will very likely have to make improvements to their studio when they get a more sensitive mic.
Acceptable USB Mics
The Apogee MiC 96K (2014, upgrade from the 2011 previous model, the Plus USB) is a
Less-Acceptable Mics
If you do use a USB mic like the Yeti to start with, realize you will likely need to improve your studio when you switch to a more sensitive traditional voice over microphone—it will pick up more echoes and background sounds from your studio. And attach it to a mic stand or boom arm so you can work standing like a professional!

🎧 Studio Console-Level Power
Every power supply must be balanced (why?)—and most are. But not all provide true 48V Phantom Power (sometimes called “Studio Console-Level Power”). Many only provide 12v or 18v instead of 48v, and even those providing 48v often provide very limited amperage!
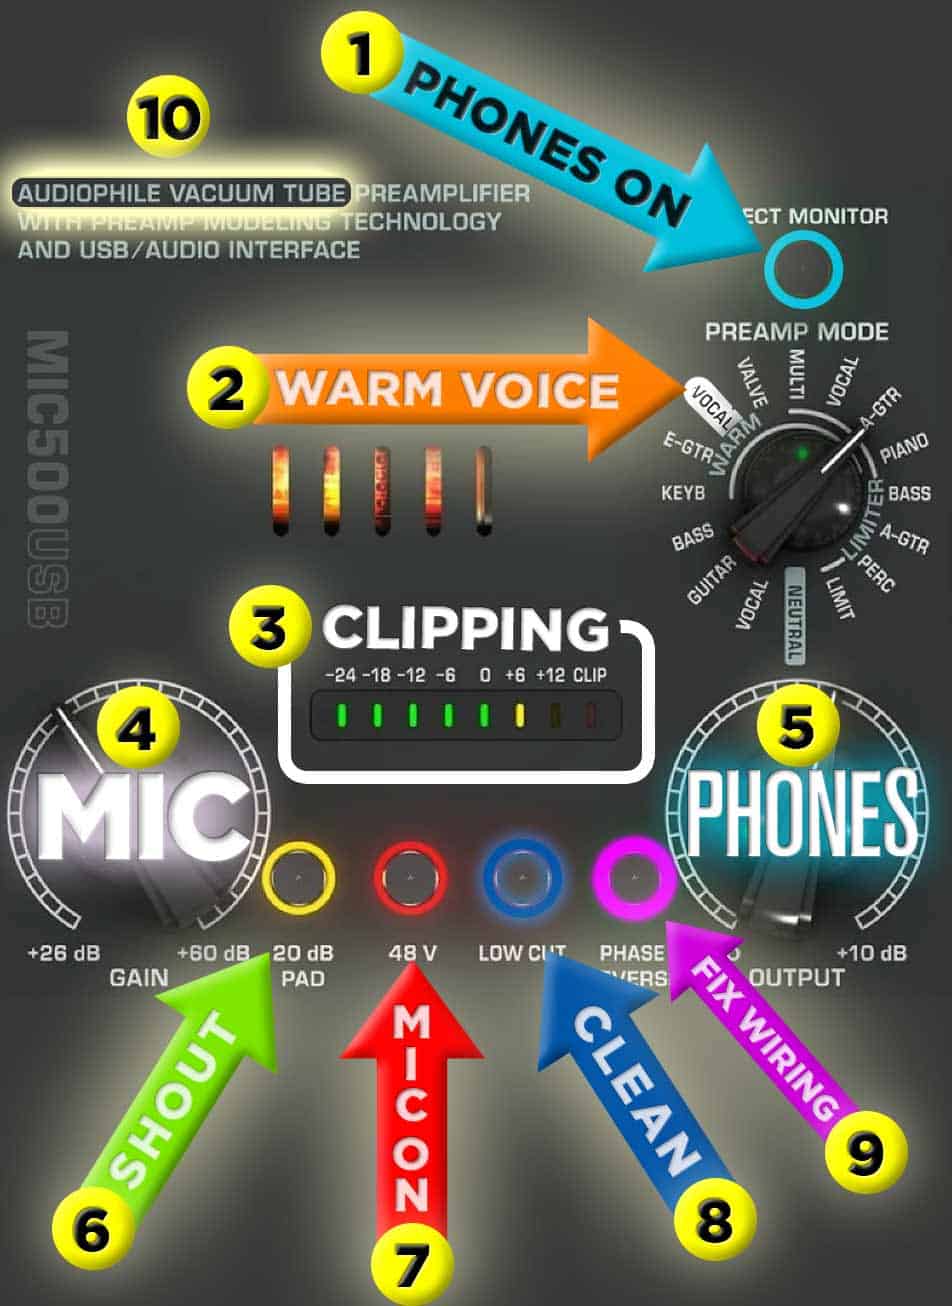
We recommend the Behringer TUBE ULTRAGAIN MIC500USB Vacuum Tube Preamplifier. I love the one I use myself. This is better than some $150 mixers for under $100. Check out the specs in the simplified manual here. Also, the Behringer VOICE STUDIO Bundle which includes the MIC500USB is sometimes on sale for less than the cost of the MIC500USB alone.
►Some sellers to NOT include the USB cable you should use to connect this to your computer. Using a preamp with a USB output is important. If you connect to your computer via an analog audio cable, the analog-to-digital (A/D)conversion will take place in the internal sound card, which is not optimized for this purpose like the A/D converter inside the preamp is.
Specifically designed for studio-grade condenser mics, with voiceover preamp modeling to optimize your sound.
🎧 FOUR-Conductor Balanced XLR
Your power and XLR cable must be balanced, but your XLR cable should contain FOUR conductors, not just two (here’s why).
The 4 conductors of Quad technology help prevent wiring or grounding issues as well as RFI interference, producing a superior signal to noise ratio that effectively acts as noise cancellation. More about why a Quad cable is better.
If your mixer/pre-amp (phantom power source) has a USB out, you also may need a USB peripheral cable—like what a USB printer uses. Some people will disconnect the cable from their printer to connect their power source to the computer until they can buy or borrow another USB peripheral cable, such as this one on Amazon.com.
🎧 NRC 1.05 Acoustic Panels: 10 sq. ft. ea.
► Save over $60 PER PANEL vs cheap acoustic foam, and over $150 vs comparable high-quality foam.
TOP-RATED (NRC 1.05—this is the good stuff!) lightweight plain acoustic panels easy to hang, mount, place or store (conforming to ASTM C423 testing). Read more about how acoustic baffling works here.
Note that even the THICKEST popular acoustic panels, such as these 4″ deep panels from Amazon, are often MUCH less noise absorbent (only 0.8 compared to these at 1.05), and are MUCH more expensive. Higher numbers are better! Amazon’s price if you have prime free shipping is $74.75 for 10 sq ft—nearly $60 MORE for LESS sound absorption!
We assemble these inexpensively from 3-inch thick Rockwool Safe’n’Sound so you can get started without spending ridiculous acoustic foam prices. Note that “thickness” and depth are NOT the same thing. The Rockwool baffling is a solid 3″ thick. In foam panels, 4-inch “thick” panels vary in thickness from 1/4″ up to 4″ due to their “corrugated” form. So 4-inch DEEP is more accurate than “thick” when speaking of panels.
► Current Price: $16.00 ea. (10 sq. ft. ea.) or $59.88 for your first four.
What’s inside:

FABRIC:
Use the thinnest fabric you can find if you use fabric to cover the insulation. Contact us if you’d like some—we often have some extra in stock (we buy in bulk for a better deal).
Fine-mesh netting is ideal acoustically, but will not reliably hold in the insulation (pieces can get into the air), and since the insulation is harsh on your skin and lungs, we don’t recommend using netting. Pretty much ALL fabric stores have a lot of discount coupons—such as for installing their app—so be sure to use a discount code when ordering from a store.
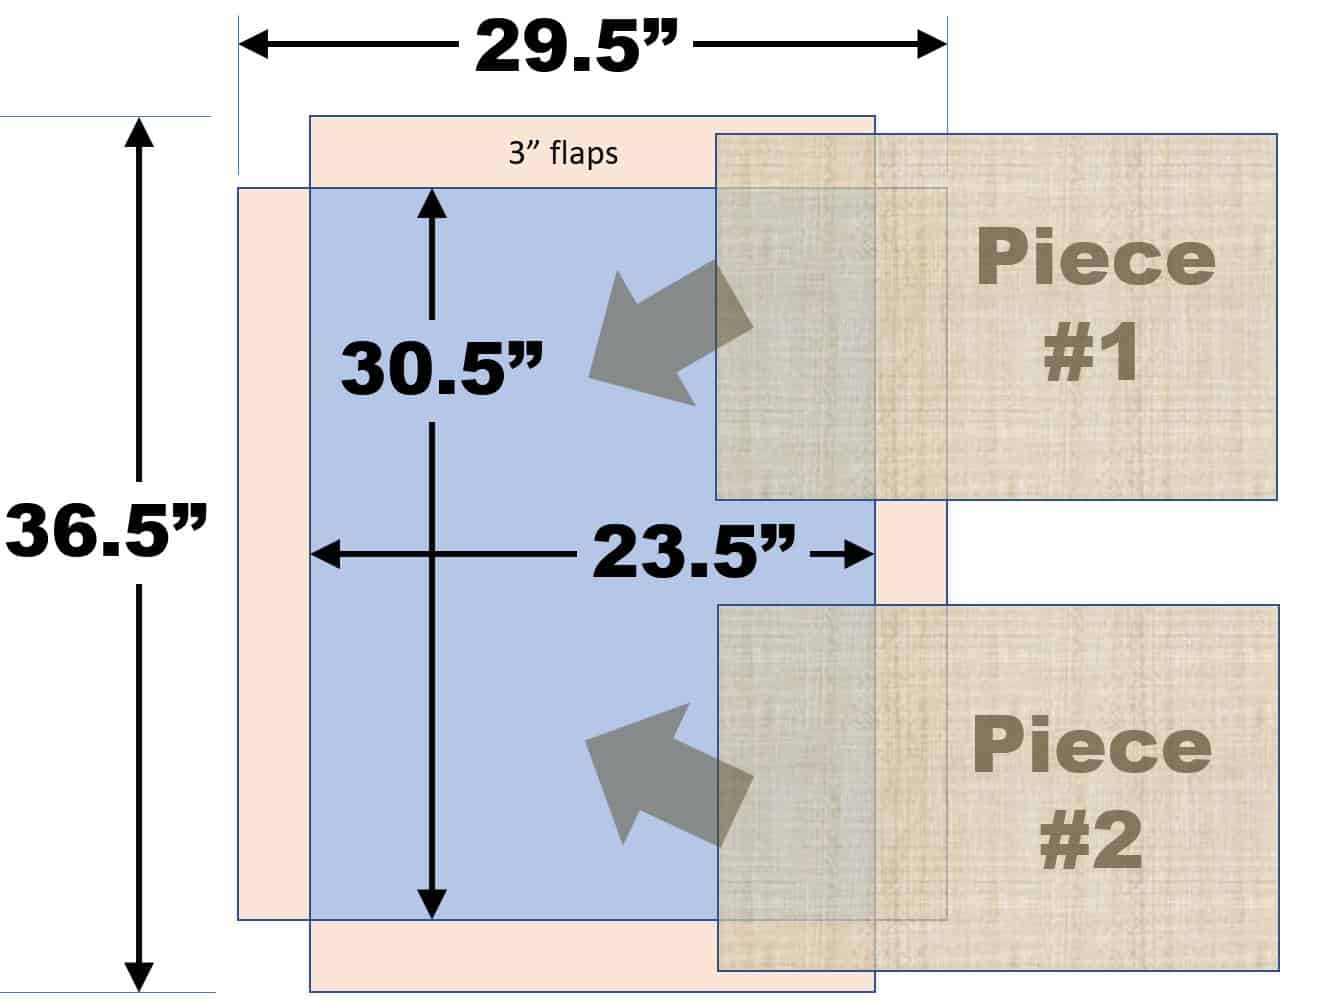
To build your own, scroll to the bottom of this article for instructions. Sample diagram:
🎧 Do I NEED Open-Back Headphones? probably? • Read this article for tips
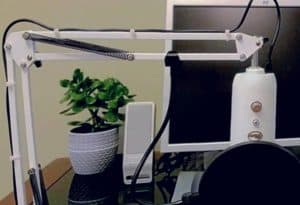
🎧 Articulating (scissor) microphone boom arm (we have lots, otherwise eBay • Amazon). Can be attached to copy stand, desk edge or many other configurations. Recommended instead of a separate mic stand: has a wider variety of uses, and is less expensive. Great for working standing up or sitting down.
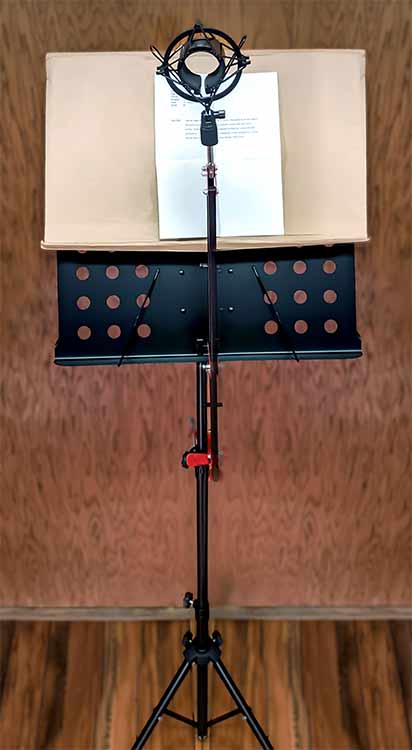
🎧 Adjustable low-sound reflection copy stand. You attach the boom arm to this. In general, most copy stands are NOT tall enough for voiceover. Everyone ends up modifying them—see the picture below at left for one example. You could buy a separate mic stand instead of an articulating arm, but it would be more expensive and less able to be useful in multiple situations, such as attaching to a desk or closet shelf.
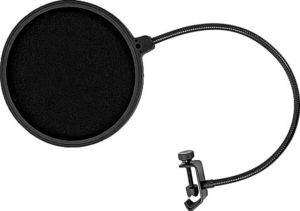
🎧 Double-paned pro 6.1″ pop filter • we have plenty (ebay) 360-degree flexible 13.6″ gooseneck • Swivel clamp base. Current price: $9.97
🎧 Additional on-mic pop filter • 5-pack from Rycote (sources here). Check to see if we have extra we can spare before purchasing. Handy for reducing mouth sounds when you get closer to the mic.
Pictures: At left is the cardboard the stand was packed in taped onto it to make the copy holder higher.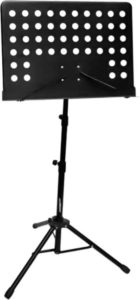

► Use Audacity 2.4.2 or later for Mac, or scroll down for instructions on using earlier versions
📌 How To Record
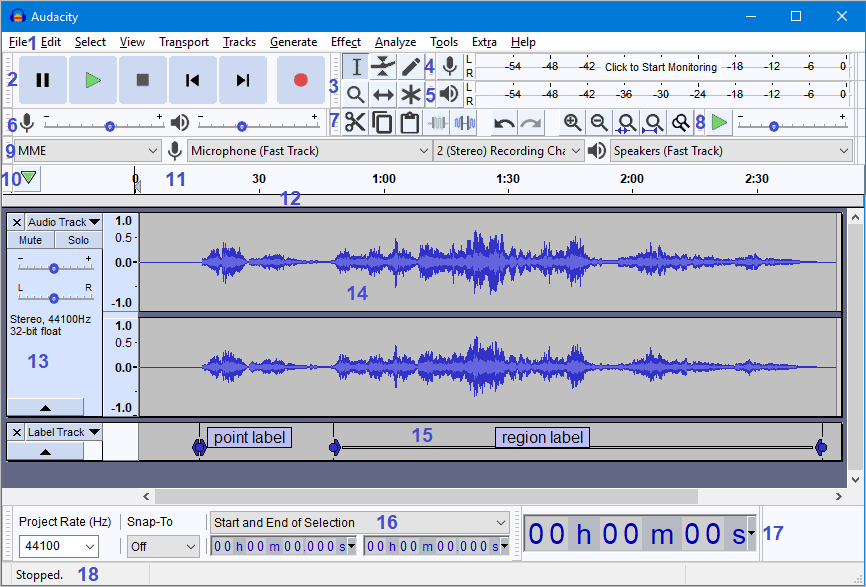
If you’re new to Audacity, click the image below to learn about the different parts of the interface:
If you haven’t yet, download and install Audacity, a free program to let you record audio on your computer:
Start by setting up Audacity so that you can record (connect to your microphone) and set basic preferences (video coming soon!)
For several videos of Audacity tips, be sure to visit this link.
Do I have to use Audacity?
No. But it’s the easiest-to-use program for recording voice over, it’s free, and it also includes very powerful features for advanced users. If you use it, we can help you with it. If you prefer to use something else, we won’t be able to help you as much as if you use Audacity.
► Follow these steps to make your first test recording.
If you prefer a getting started video tutorial, try this one:
Once you’ve gotten a few basics down, learn these tips:
1. Save the Project, Not Just the Export
When saving an Audacity project it is normally easiest to use the File > Save Project command, which has a default shortcut of Ctrl + S (or ⌘ + S on Mac). The first time you save it will prompt you for a file name. If you save a project again having made further changes to it, there will be no further prompts—it will just save.
To share audio files, you will need to export them. Don’t try to share an Audacity project! The project and its related files stay on your computer. We suggest watching the following video below to learn how to export using Export Multiple, which can also be used to export single files. It’s the best way to create an audio file to share it, in our opinion. Alternatively, you can click ‘File’ then click on ‘Export‘ to bring up the File Export window. It gives you options on where to save, type in a name, and choose a file format to export to.
Making a commercial from voice over in Audacity by adding music and sound effects is known as sound design. (To learn how, go here.) Once you’ve added all the voice and sounds into Audacity, click the File Menu and save it all as a project.

Eventually, you will export your work (the option underneath Save Project), but always keep all your tracks and modifications saved as a project separately.
If you are going to modify a track, such as your voice over, first duplicate that track, drag it down to the bottom of the project, and mute it. This is just so you have easy access to a backup of the original track before you started modifying it. To duplicate, select the track (double-clicking anywhere in the track will work) and then use Ctrl-D (Windows) or Command-D (Mac)—or click the Edit Menu and choose Duplicate.
Your main goal in saving your project workspace (vs only saving the exported file) is to be able to go back and make changes later, even after you export your final draft of the commercial.
Exporting and Sharing
If you don’t know what format the client wants, export as a .wav file (large) or high-quality .mp3. You can NOT share a file from your software—you have to export before sharing. For example, a .aup file created by Audacity is actually just a shortcut to the audio database on your computer. There are few cases where you would share an entire project from your software—you would only share the exported files.
To share your work on social media, you will often have to convert it to a video (mp4 is a common video format that will work everywhere) if you want it to play inside the social media post. That means, at a minimum, choosing a static image that will be visible in the video while your audio plays. To find an image that gives you the rights to do this, try Pexels. To convert your audio to video with the image you choose, use ez-converter.
2. Control Clipping at ALL Stages
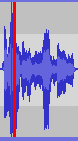
Oversimplified, clipping is audio distorted by being too loud. The rounded top or bottom of a waveform is “clipped” off. When you are viewing audio in Audacity, clipped areas appear red (IF you have set Audacity to make clipping visible, see next paragraph). Here is an example of viewing the same clipped audio at two different zoom levels:
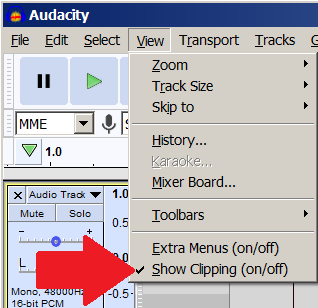
Audacity can fix mild clipping, and it’s particularly good at fixing clipping in voice-only recordings. The first step is to set your bit depth to 32-bit float and see where clipping occurs by turning on “Show Clipping” at the bottom of the view menu. Simplest is show clipping all the time. (Alternatively, you can have Audacity search for clipped areas by using the “Find Clipping” Analyze function.)
🎧 Technical note: Think of the bit depth setting as the place where your computer stores the volume or loudness of your audio (more accurately called amplitude). Your sampling rate is the place your computer stores the pitch (more accurately called frequency) of your audio.
Control during recording
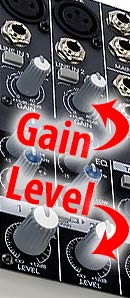
When recording, you will adjust amplitude levels (louder or softer) using knobs on your mixer (these knobs are sometimes called “pots”, short for “potentiometers”).
If your mixed has BOTH a level AND a gain knob (check the labels on the mixer itself) set the “Level” knob midway between max and minimum (usually straight up) and turn up the “Gain” knob until your voice at normal volume is clipping often—but not all—of the time. Then turn down the “Level” knob until your voice is sometimes but rarely clipping. Occasional clipping is better than setting levels too low; very low levels will can over-amplify background noise. (If your mixer has more than one channel, make sure you are adjusting the channel your microphone is plugged into.)
Control during mixing
When you add music and sound effects, you may have to quiet everything 1dB or so, or the power of voice and music combined may clip a bit too much. Fortunately, it’s easy to see what is going on and adjust accordingly.
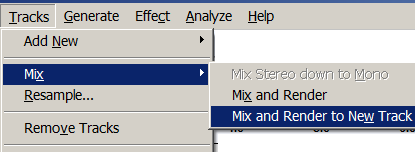
Here’s a simple way to tell: Select all (keyboard shortcut: ctrl-a/Windows; command-a/Mac) and then mix everything down to a single new track (picture at right: Tracks Menu > Mix > Mix and Render to New Track).
If there isn’t much that is red/clipped, select either the entire new track, or only the main areas with red/clipping, and choose Effect Menu > Clip Fix. If there’s a lot of red/clipping, delete the combined track (or just undo (Ctrl/Command-z) the new track you created) and quiet (reduce the gain) one or more of your tracks a bit. The easiest way to quiet the level/gain of a track overall is to drag the +/- slider at the left edge of the track.
If you want to understand advanced settings better—NOT required!—read these next:
Looking for Troubleshooting Tips? Here they are!
Simple Studio Tips
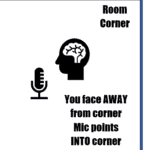
First of all, there should be a quiet corner behind you. You face into the room, the microphone faces into the quiet corner.
It doesn’t matter how you deaden the sound in corner, anything from hanging acoustic panels to putting shredded fabric in chicken wire will work! For the least expensive acoustic panels anywhere, be sure to talk to your School of Voiceover or Academy of Voiceover coach for a deal we give to students.
Second, there should be something behind your copy that “catches” some of your voice, such as hanging a blanket in front of you, and pinning your script to it. Or something behind and slightly around your microphone, such as a fabric bowl. Don’t let it come around the sides of the mic much, though—you don’t want to put your mic in any kind of tunnel—that will change the quality of your sound.
Tip for better audio:
If you’re new to recording, try to just barely avoid clipping. Eventually, you’ll want to record at a high amplitude—record loud, as loud as you can get away with. If you don’t, you many have to increase the amplification of your recording, and that means you will ALSO be increasing the amplification of any noise on the recording.
How loud works best? To the point where your audio is actually or nearly clipping slightly from time to time. To visually see if your audio is clipping when you record, in Audacity click the View menu, and put a check mark by View > “Show Clipping (on/off)”.
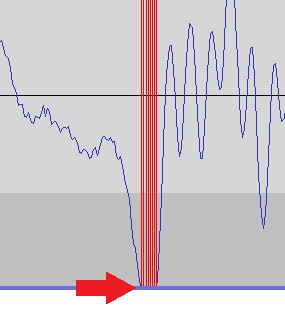
What does “some, but not too much” clipping look like? If you were looking at 10-15 seconds of audio on screen (it looks different at different zoom levels), it might look about like this:
How Much Clipping is Okay to Allow?
But isn’t this a mistake? Isn’t this “bad” audio? How would you fix this, anyway?
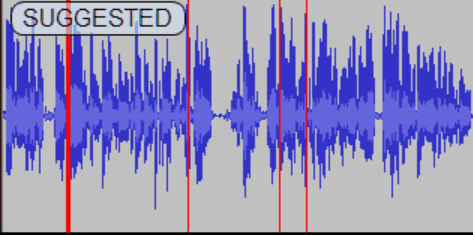
Audacity and its competitors all have a “Fix Clipping” feature. In Audacity it’s Effects > Clip Fix. Since the top of a peak (or bottom of a valley) of your audio waveform has been cut off, what Clip Fix does is calculate what the missing peak (or valley) would look like, and “draw” it back in. Let’s zoom way, WAY in to the clipped area in the picture above (the red line) that is farthest left—under the “G”. Here’s what that looks like:
Zoomed in View of Clipping
See those four vertical red lines? That marks the part that’s missing—the part of a peak that was “clipped” off. The blue lines mark the part of the waveform that was recorded accurately—we’re zoomed in so far we see the audio as digital “points” instead of a smooth analog waveform.
But: See how easy it is to see visually what part of the peak is missing? Audacity won’t have any problem adding the missing peak back in. Heck, you could probably draw them in with a marker and get pretty close to perfect. And it will sound as perfect as if it had never clipped. If we zoomed in a bit less than this, you would see there are about six peaks and valleys that look like this in the dark red line under the “G”. Each easily fixed automatically by Effects > Clip Fix.
Again, ideally, you want your audio to undergo ZERO amplification increase after recording; otherwise, you will ALSO be amplifying your background noise (“Room tone”). So DO allow slight clipping so that you will actually be DECREASING your your audio amplification slightly, which also decreases your background noise!
For voiceover, occasional light clipping is fine. Yes, it means you are “risking” too much clipping, but think of it this way:
Instead of spending another $5,000 on your studio to be able to record at lower dB settings, gain experience with when and how much you clip, and let occasional clipping happen.
A very small amount of skill in allowing clipping can save you hundreds or thousands in studio upgrade costs!
What is Good Audio?
First, let me point out that you should always record more than a second of silence/”room tone” (leave setting alone—don’t change them after you begin speaking) at the beginning and end of each track. Some clients and marketplaces even require it. It help you and them hear your “room tone” and it can be used in a variety of ways.
Some of the most well-known standards in the world for quality voice over audio are part of the ACX (Audiobook Creation Exchange) Audio Submission Requirements. I wouldn’t suggest reading it (yet) until explain some of the basics behind the technical language, but I’ll relate this discussion back to those requirements.
Most important: When you make changes, work on a COPY of your recordings. Simple way to do that: After you’re done recording and saving, do a Save As of the session to create a copy of it, and work on the copy.
There is a plugin for Audacity (get it here, install (how?), then choose Analyze > Add/Remove Plugins to enable) that will do most of the necessary measurements for you. You don’t have to learn a bunch of technical language about audio engineering concepts. It measures the three most important things:
- How loud is background noise? We don’t want to hear your air conditioner or the traffic in your neighborhood. Measured as “Noise Floor“—ACX standard: “No higher than -60dB RMS”. This is where recording as “loud” (high gain) as you can helps the most.
- Is the volume fairly consistent? Don’t make listeners keep having to turn the volume up or down when listening. Measured as “RMS Level“. If volume isn’t consistent enough, simply run the compression effect at default settings—ACX standard: “Between -23dB and -18dB RMS”.
- How loud are the loudest moments? This is just a one-click (Normalize) setting you choose before measuring. Measured as “Peak level“—ACX standard: “peak values no higher than -3dB”. Imagine you are clipping at about +.1 dB. That means you can lessen the amplitude by 3.1 dB to bring it into ACX compliance—and the process, lessen your background noise by 3.1 dB too!
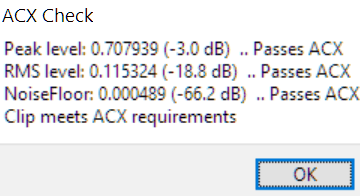
Here is a partial screenshot of what you get when you select some audio to test, and choose Analyze > ACX Check from the Audacity menus:
There are ways to “cheat” to pass a home test of ACX requirements, and still fail the actual test. Two things NOT to do: Do NOT replace breath sounds with complete silence, and DO include some “room tone” at the beginning and ending of your recording for testing purposes. More about these two tips below.
How Quiet is Your Voice Over Studio?
Think of the noise floor as “How loud is the silence in your studio?” A quick way to get an approximate idea is to record a few words in your studio, then continue recording but hold your breath/hold still/make no sounds for a few seconds and watch the Recording Meter Toolbar. Here is what it looks like in Audacity before and after you start recording,
![]()
![]()
When you are “recording silence” (room tone), you want the color to stay at the far left, typically not to go past -42 on the scale. Note that what you see is only an APPROXIMATION of what a test will show. You’ll still need to run ACX Check (or something similar) to be sure.
Tip: Do a retake when intermittent noise happens, e.g. you bumped the mic, a dog barked, a plane flew over, a truck drove by, etc.
Whenever you record, always include a few seconds at the beginning and ending where you make no sound. This isn’t silence, this is what is called “room tone”, or “background noise”.
If your “room tone” volume is too loud, you can take a sample of it and remove it from the recording using Effects > Noise removal.
Realize you can only do this if you have recorded some room tone! However, what also can work is to make a copy of a track (Ctrl-D) and deleting all the sounds made by you. Once you have a few seconds of room tone left you could try using it as the sample for noise removal. So any time consistent sounds change in the background, go silent, keep recording, and get a new silence/room tone recording. Then use that sound as the sample for noise removal.
For ACX specifically, they require you submit your audio with room tone at the beginning and ending of your recording (“Each file must have 0.5 to 1 second of room tone at its beginning and 1 to 5 seconds of room tone at its end.”)
You’ll have to use your judgment! If a steady/consistent background sound is too loud, you may have to wait for it to end before recording. (Of course, for intermittent sounds—such as a dog barking—you’ll almost always have to wait and retake).
Tip: If your studio is quiet enough that it passes a noise floor test without doing any noise removal, you can probably use noise removal when remote distant sounds occur. But if you are already having to remove background noise from your studio “as is”, when other sounds happen, you will probably have to wait to record more. Too much noise removal reduces the quality of the overall recording—your voice will start to sound weird.
ACX, also requires that you NEVER replace anything with silence, such as breaths. You can only replace them with whatever recording you have of “room tone”. Our new macro for Audacity will help you with this.
Is Your Audio Volume Consistent?
Even if you aren’t producing an audiobook, if your recording seems to vary between too loud and too quiet, you’ll need to adjust it.
This is very easy to adjust via Effects > Compression. To experiment, try making a recording, run Effects > Normalize set to -3.0 dB and then select the audio and run Analyze > ACX Check on it. Write down the number in parentheses that appears on the screen after “RMS Level”. In this example screenshot, you would write down -18.8
Now select your audio and run Effect > Compression, and then Effects > Normalize (again set to -3.0 dB), then run Analyze > ACX Check again. See how the RMS level has gone down? That’s because the compression effect makes your audio volume more consistent—the quiet part are made louder without changing the loud parts.
However, if the reason it varies is because you are moving your head too much during a session—or changing position between sessions—you may want to re-record. Generally, this is NOT an issue if you have had some on-mic training. Moving around a bit is okay! One thing you SHOULD avoid is turning your head much. Again, a little is okay, but if you aim your mouth away from the mic too much AND get too far away, you’ll become very quiet on the recording.
Why Care About ACX Voice Over Requirements?
You don’t have to. Many ACX requirements are common sense, such as that your audio must be:
► “Narrated by a human”;
► “Be free of extraneous sounds such as plosives, mic pops, mouse clicks, excessive mouth noise, and outtakes” (notice they do NOT say to exclude breathing sounds);
► “All in the same … format” (all mono or all stereo);
► “Be consistent in overall sound and formatting”.
Fixing Mouth Noises
One of the first steps is to install some great Audacity tools that can help you! See this article for tips about click and pop removal techniques
Click to enlarge:
A Good VO Mixer Does What?
We like the MIC500USB. Here’s what it does:
- Direct-connects headphones. Connecting headphones anywhere else may introduce a delay, or phase reversal. Having an on/off button is also useful, so you can stop listening to the mic when you are listening to recorded audio, or when the talent is warming up, clearing their throat, etc.
- Provides vocal adjustment. Some folks own thousands of dollars of mics for different sounds, when they could just be using preamp modes! Save your money: get mixer with more than one preamp mode. Some mixers include one mode and that’s it! Always seemed silly to me vs. having multiple modes.
- Shows Clipping. You MUST see this BEFORE it reaches your recording software.
How to Use: Watch the lights while you set the gain (4) You want to see ONE yellow led occasionally, TWO yellow led’s rarely, a red led NEVER. AFTER you have set the gain, only then adjust microphone volume/level in your software.
- Provides Mic Gain Adjustment. Some mixers also provide a “fader” or “mic volume” control…that you don’t need or want if you have gain control. Read above for how to use.
- Headphone Volume Control. Seems silly to leave this out, but some mixers don’t provide it.
- “Quiet Mode”/20dB Pad: This decreases the gain (lowers the volume) of the mic by -20dB. Love using this when a script calls for shouting. Beginners back up, but pros hit the -20dB pad and get high-quality audio at all volume levels.
► You should practice using this! See how loud you have to be to generate audio at the same volume with the pad pushed on. You can back up when you need to get loud, but that brings in a LOT more room echo, and makes your voice sound “tinny”—useful if you WANT to sound “off mic”, but better to hit the pad when you need to get loud.
- Mic Power. Extend the life of your mixer and mic by turning off power when they’re not in use.
- Cut Subsonics for Cleaner Sound. You actually MUST do this somehow, somewhere. Subsonics are everywhere (floor rumble, HVAC noise, plosives, etc.) and they muddle up other frequencies and make mouth sounds worse. If your mixer doesn’t cut them, those sounds have to be cut later, after they have already affected your audio.
- Provides FULL 48v Power. Sadly, many if not most budget mixer/preamps do NOT provide full power, and do NOT say so on their spec sheet. You’re left guessing. This helps mics that need more power work properly and often, mean less mic “self noise”, helps many mics work their best, and never leaves you with a mic that won’t work well with your mixer.
- Provides USB Audio Out. The internal sound hardware on your computer should be avoided when you can. It can lower the quality of your audio, cause necessary device setting issues, and introduce latency (delay). So bypass the analog audio input port on your computer when you can.
- Acts as a Tube Preamp. The circuitry that amplifies your voice before it reaches your software is the preamp. Tube circuitry (instead of solid state) has long been preferred for voice, hence the label on the mixer “Audiophile Vacuum Tube Preamp”.
- Doesn’t Break the Bank! The real benefit of the MIC500USB is that it does all this at a much lower price than other mixers with these features. You don’t have to cut corners to save money.
You almost lose #9 or #10 or #1 or all three with cheap mixers. Expensive mixers sometimes skimp on #2 or #8.
Bonus: Phase/Polarity reversal:
This has several potential uses in a studio with multiple mics and preamp/mixers, but for single mic voiceover you’ll probably never need it. However:
If your headphone cables or Mic XLR cable is reverse wired, press this button to fix it. Experiment by talking into the mic with your headphones on and see which setting sounds most natural to you—on or off. If you’re not sure, leave it off.
The potential issue is that your voice through the headphones may be polarity reversed compared to your voice through the air. Think of how a speaker pushes air: when it’s pushing forwards into the room, it’s pulling on the air inside the speaker. The air on one side of the speaker membrane, like a drum, is polarity reversed on the other side. To an observer on one side the drum is pushing out, but on the other side it’s pushing in.

Important Audacity tip for Mac users!
Make sure you have the latest version of Audacity for Mac, 2.4.2 or higher. Download here.
If you do NOT have the latest version of Audacity, here are the old instuctions for making it work. But: better to IGNORE THESE INSTRUCTIONS, and instead use the latest version of Audacity!
Here are the old instructions:
On the latest macOS (Catalina/10.15/Late 2019) you just need to give Audacity permission to use the microphone, and don’t close Audacity. It’s easy! You just have to open it via the “open” command. Here’s how:
If you haven’t already, install the latest version of Audacity from AudacityTeam.org/download/mac. (If you want to update an older version of Audacity, it works the same as installing new—just download and install.)
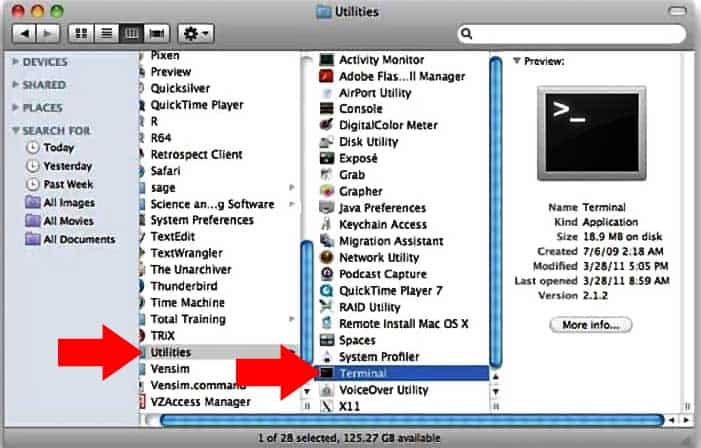
- Make sure Audacity is NOT running. If it is open, close it. Here’s how to open it—from the Mac Finder (picture below), you want to got to Applications, then Utilities, then click on Terminal. A small window opens.
- Paste this (after copying, to paste, simply click Cmd-V) when the terminal window and press enter:
open /Applications/Audacity.app/Contents/MacOS/Audacity - Audacity should open, and a small prompt should appear asking you to give permission to use the microphone if you have one plugged in. If you don’t have a mic connected, the prompt may not appear until you plug one in and click Transport > Rescan Audio Devices. Whenever the prompt appears, click to give permission to Audacity to use the microphone.
Leave Audacity Open?
Easiest: Leave Audacity active—(black dot) in the bottom dock —don’t close it! That way you can just relaunch from the Audacity logo, and you won’t have to give microphone permissions each time.
However, if you totally quit Audacity, it’s okay, just a minor hassle. You simply have to relaunch from the Terminal app again—meaning you have to redo steps 1-3 again.
IF YOU LEAVE AUDACITY OPEN: You’ll need to chose rescan audio devices from the Transport menu (click on the word Transport near the top of the Audacity window) anytime you plug in a device such as a headset, microphone, speakers, etc. and then choose which device you want to use to record through (such as a microphone, headset, microphone plugged into a mixer, etc) and which device you want to play back through (such as speakers, headset, etc.).
For more info on selecting devices in Audacity, see select your recording device.
Mac Microphone Auto-Shut Off
For security reasons, you can’t close the lid on a Mac and keep recording. iPads have a similar security feature. Explained here:
“All Mac portables with the Apple T2 Security Chip feature a hardware disconnect that ensures the microphone is disabled whenever the lid is closed. On the 13-inch MacBook Pro and MacBook Air computers with the T2 chip, and on the 15-inch MacBook Pro portables from 2019 or later, this disconnect is implemented in hardware alone. The disconnect prevents any software—even with root or kernel privileges in macOS, and even the software on the T2 chip—from engaging the microphone when the lid is closed. (The camera is not disconnected in hardware, because its field of view is completely obstructed with the lid closed.) iPad models beginning in 2020 also feature the hardware microphone disconnect.”
Alternative Method
- On your Mac, choose “Apple menu > System Preferences, click Security & Privacy”, then click Privacy.
- Click Microphone.
- Select the tickbox next to the Audacity app to allow it to access the microphone. (Do not deselect the tickbox to turn off access or the mic will not work).
Long story short, for text-heavy pages, you want larger font sizes. If folks are reading for long periods of time, be nice: don’t make them strain their eyes. Now, each font is different, even at the same size, but we’re talking: