
All studios certified via Studio Audio Testing
“Pass your SATs with confidence”:

This is primarily about a commercial demo, but many of the guidelines apply to other demos.
Quick, oversimplified notes: What kind of demo should be obvious to the listener. If you include anything that is not a strict fit for your demo type, make sure it isn’t in the first three clips. If you are using an intro or slate, make sure its obvious that it’s not a clip. Most demos are rejected quickly. No one cares about variety if they don’t listen past the first few seconds. Also, shorter clips are generally better. The listener ‘gets it’ in a few seconds. 3-9 seconds per clip is fine (standards below). Video clips are useful as they can convey more, like a list of characters in a character demo.
Just want to know what to do to produce your own clips? Click here or scroll down.
If you want your demo evaluated by us, realize YOU MUST FOLLOW these standards. We will evaluate how well you follow these standards.
Demo: Video Examples
Video or Audio Demo?
VIDEO IS BEST on your own website, or a freelance marketplace like Fiverr, Upwork, PeoplePerHour, etc.
AUDIO IS BEST to send to an agent, or on VO audition marketplaces such as VOPlanet.com, Bodalgo, Backstage, etc.
🔻 Click here: What to Consider Before Doing a Demo Reel
Are you under the assumption you must have a certain kind of demo in order to “be a voice talent”? If that’s all you know—you probably don’t know enough. Do NOT get your advice from the people who sell demos—or the people they’ve sold them to, or “general internet forum advice”.
Generally, anyone telling you “make a good demo” is leaving out a lot. Some folks make a fulltime income from demos that are little more than “Hi, my name is [name] and I will do [area]-accented voiceover for your commercial sot or educational video….” etc. Getting a “better” demo often has little relation to making “better” money.
1. What’s It For?
- Has someone in the industry that you are NOT paying money to asked you for your demo? Sometimes the “ask” is actually a way to get you to buy demo services from someone, “We’d love to add you to our roster if you would provide an updated demo (and by the way you can pay us to update your demo for you.”)
- Are you posting it on an online marketplace like Upwork, Voices.com, Fiverr or Casting Call Club?
- Your finished demo will generally need to be playable as a video these days, either with a still picture or moving images (e.g. stock video clips). It will also need to be available as an audio-only mp3 file. Click here for a sample of a traditional VO demo that has been converted into a VO “Sizzle Reel”.
- Are you updating an existing demo?
2. Is Your Studio Good Enough?
Have you attached enough to the back of your microphone? If you don’t have at minimum a folded fuzzy bath towel on the back of the mic, your studio isn’t as good as it could be. ON the back of the mic is Zone 1—the most important space in your studio, acoustically speaking, and a space you have a lot of control of.
Most agencies now require you to be able to work remotely, so you need access to a studio or your home studio needs to be good enough. You don’t have to solve your studio issues today, but putting a lot of effort into a demo is a waste of time if you don’t have anywhere to record from.
3. Acting Quality
None of the effort is worth it if you can’t produce good acting working on your own. This is difficult and confusing. You may know a lot and have taken training and been produced—but that doen’t mean you’re good at producing yourself. Generally make sure you are speaking in groups of words—chunks or “clumps”, and don’t punch any words. Punching is for sports announcers, promos, and radio DJs, not for professional voice talent.
4. Choice of Scripts
Don’t generally use old scripts you find on the internet. “Steal” scripts from existing top talent demos, or by transcribing recent commercials or other appropriate sources. Edit them as needed.
If you’re not sure what to include, a mixture of not-too-famous commercials—a commercial demo—has been best, traditionally. And that’s still a good approach today. But with the rise of marketplaces vs agency work, including some educational narrative on your demo (as for e-learning videos) is your best option if you will be posting your demo on a marketplace.
5. Production Quality
Even if your studio is good enough, you still have to set the gain on your mixer correctly, position yourself properly on mic, deliver finished audio that is within an appropriate RMS range, connect tracks together appropriately, etc. Scroll down to learn more about the basics of demo production.
6. MOST IMPORTANT‼
- Yes, we can help you make a demo, but NO this article is NOT to get us to help make your demo! This is YOU making your demo. These are tips for YOU to follow. You choose clips, you put them together, etc. If you want our help, or to have us to choose clips, edit audio together, etc. contact us.
- Radio folks: Do NOT include anything related to a radio station!
- Your first track/clip must have a real person speech pattern in the first three seconds.
- For demos that are primarily a collection of commercial clips (most common) each clip must sound like it could have come from a collection of actual commercials of your voice only.
Generally, one or three short commercial-only clips that contrast with one another, no voice fading or silence between clips. We suggest NOT trying to create a full (more than three clips) demo until you have already produced a demo with three great clips that are authentic and different from one another. Clips are short! 5-11 seconds. Read more about that below. Just produce one great clip before attempting three.
Free Demo Clip
Everyone who passes a free audition has the option to receive a free demo clip session within 30 days. Contact us to request an audition.
The example below was recorded in a 10-minute zoom session with an untrained student with no prior experience, on an Amazon Fire tablet:
Original Recording:
After Edit and Upgrade:
Recording can be done via phone, laptop or tablet if you do not have a microphone or studio. Low-quality recordings will be upgraded by us to demo quality.
🔻 Click here: ORDERING AN EVALUATION
You MUST read all the way through the post below before ordering an evaluation!
We will review Demo standards for Audio, Production, Speech and Acting
A $29 part 1 preliminary evaluation (click here to order) in most cases should provide enough suggestions to lead to a significant improvement in quality, and help you understand some of the types of issues and improvements possible, as well as avoid key issues that can cause immediate rejection. Allow several weeks to receive your evaluation.
Plus, crucial issues will be noted. However, not every instance of an issue will necessarily be pointed out, though no particular type of issue will be ignored. For example, we may point out a mis-articulation but not point out ALL mis-articulations, particularly since some slight misarticulations are allowable on most demos.
We have read many agent evaluations of demos over the last 15 years, and agents rarely agree or provide identical feedback on the same demo! Agent evaluations are based on the clients, scripts and talent they work with most frequently at their agency, as well as their personal biases. Note that it has become rare for outsiders to any agency (not already repped at the agency) to receive much specific feedback on their demo.
Here is the “What to do” section:
Let’s start with two audio-only demo samples. Each is the first demo produced for two non-professional talent, after training at the School of Voiceover.
Want to start with specific guidelines—what you need to know to create your own demo? Scroll down or click here. Otherwise, start by listening and reading the notes on these two demos:
Demo: Audio Examples
Female Demo Sample
Male Demo Sample
Click above to listen. Click an image below to enlarge:

FEMALE DEMO
Neither of these recordings is intended as an example of a “perfect” or somehow flawless demo. These are simply the most recent male and females demos we produced at the School of Voiceover at the time of this writing. Each is a collection of decisions that could have been made differently. Each has flaws—some well hidden, some slightly obvious. We typically narrow any demo down to 2-4 versions before settling on a final version.

MALE DEMO
The images above are what the audio looks like in Audacity after mixing tracks together with their sound effects (lengths are in seconds, and were added graphically). These were produced for non-professional talent still taking classes, who have yet to contact their first voiceover agent. (Video Demo Samples)
The first thing to note is how all tracks are heavily compressed—lots of blue, very little gray—low RMS. As we point out under Basics 1.1 and 1.2 (below) you need to max out your levels a bit, starting with compression to lower the RMS (increase the loudness).
Next, notice that the fifth female track—Neutrogena—at nearly 19 seconds long, stretches the standard about avoiding extra-long tracks. But listen to it: the commercial has a lot of variety, and talent show great range in the different sections of this single clip. The point here was to showcase the talent’s ability to cover a wide range in a single performance as that is one of their strengths. And four standard-length tracks precede it.
Also, the Female sample has three clips in the Beauty & Personal Care category, also stretching the standard about similar clips. Of course, they are all separated from one another, and are not identical subcategories (hair color, mascara, facial cleanser, respectively). The point here is that this category is where the talent is likely to be competitive. Excluding the extra-long clip, the average length of clips in the female sample is a typical/desirable 7.3 seconds.
Clips for the Male talent follow the standards more closely—the longest clip is 11.35 seconds, the shortest, 1.8. But again, there are three in the Liquor category, and two in the Automotive category, stretching the category standard. In this case, these showcase where we think the talent will be competitive—and, the talent is a bartender.
Key Demo Standards
Want to hear and see demo samples? Scroll up to here. I will use the term clip interchangeably with track to mean the same thing: an individual commercial on your demo.
Each clip should be under 12 seconds; no “stand alone” music—no music before or after voice; words and music must be COMMERCIAL, this is an evaluation of a commercial demo (how to measure RMS in Audacity).
MOST IMPORTANT‼
- This is NOT to get us to help make your demo! This is YOU making your demo. We simply provide tips. You choose clips, you put them together, etc. If you want us to choose clips, edit audio together, etc. contact us.
- Radio folks: Do NOT include include anything related to a radio station!
- Your first track/clip must have a real person speech pattern in the first three seconds.
- Each clip must sound like it could have come from a collection of actual commercials of your voice only.
You need a minimum of three short commercial-only clips that contrast with one another, no voice fading or silence between clips. We suggest NOT trying to create a full demo until you have three great clips that are authentic and different from one another.
CONSISTENT AND LOUD LEVELS (compression / levels / clipping)
Make your voice loud BEFORE adding music: You MUST use compression to achieve maximum amplitude (loudest moments at peak), and make quiet parts louder.
Select audio to measure loudness after compressing; seek to achieve an RMS of between -10 and -13.99. You can repeatedly compress audio until it is loud enough. Measure via Analyze > Measure RMS or YouLean Loudness Meter plugin (enable RMS measurement in Audacity if needed via to open the Plug-in Manager dialog—there you will find the file listed as “rms“, but it will enable as Measure RMS).
RMS or LUFs are measures of loudness—the average energy of sound. Visually it is like the ratio between the colored part you seen on screen (the sound) in your DAW (such as Audacity), and the background. The more sound there is covering up the background, more sound energy there is.
Compress voice more than 3.5:1 ratio. Compress repeatedly until loudness !
1.1 Adjust voice separately—before adding music or sound effects! These steps apply to your voice BEFORE adding anything to the mix, AND apply to the overall mix.
1.1.1 Make voice loud—maximum level/0dB AND loud RMS/high compression ratio
There should be no visual “gap” between music peaks and the top of the track in your software. Many of your peaks should be at or very near maximum (0dB). Minor clipping is expected once music is added to voice.
1.1.2 Voice should not fade in or out unintentionally.
1.2 Track levels should be at maximum. RMS between -10 and -13.99
Any overall RMS closer to zero than -13.99 is good, though opinions vary. The main part of a specific take, excluding any fades (and minimizing vocal and music quiet parts if needed) should be closer to zero than -11.99.
There is no limit to compression/RMS—as long as it sounds good, it’s okay for a demo. In practice compressing at a ratio between 4:1 and 25:1 is typical for voice compression. (Most tools will require you to repeatedly compress if you want more than a 10:1 ratio). You can measure RMS in Audacity via the Analyze Menu > Measure RMS. (If you don’t see “Measure RMS”, enable it via Analyze > Add / Remove Plug-ins… to open the Plug-in Manager dialog. Enable “rms” which may appear as “Measure RMS”.)
1.3 Even, Consistent Levels from track to track Apparent and actual volume levels from clip-to-clip must be similar—the overall level shouldn’t get or feel significantly louder or softer. If something “feels” faint or faded and other approaches don’t help, try increasing levels to the point you have more clipping. This does NOT mean talk louder! Speak intimately or softly wherever appropriate, but increase the gain/amplitude—to make the quiet parts louder. Compression is the easiest way to do this
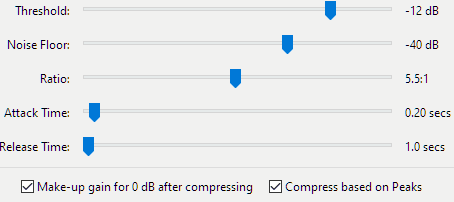
1.4 Compression: voice before adding music: Oversimplified, compression makes soft parts louder. Run compression on each vocal track individually before adding music or sound effects (you can also make manual adjustments), generally at a ratio greater than 3:1 (or run it more than once at 2:1) ). To do this, select/highlight your audio, and (if you’re using Audacity) click the Effects menu and choose Compression. Here are some suggested settings (set compression based on peaks, and a ratio higher than 3:1 are the main suggestions). You do NOT need to run Normalize or Amplify after running compression:
1.5 Voice more prominent than Music: The voice should come through more prominently than the music/sound effects (SFX), but the music/SFX should be “present” enough to add emotion (music should be neither too loud nor be so quiet as to be barely noticeable).
You may need to normalize audio to -2dB before posting on a forum or adding to a video, because transcoding will cause some distortion of loud audio at high levels.
Length/Spacing/Quantity of Clips
Be aware that length may be limited by where you post your demo. For example, Fiverr allows a maximum of 75 seconds for most gig media. If you include an intro or outro with your demo (common on marketplaces like Fiverr) you may have to cut to stay under the maximum. The discussion of clips on this page does NOT take intros or outros into consideration.
The reality is that most people won’t listen to your entire demo, so you need to demonstrate what you can do quickly. This is why short clips that blend into one another is the standard—to “keep it moving”, and pull listeners forwards.
2.1 Clip Length: Each demo clip should be 5-9 seconds long (12 seconds maximum), and your first clip on a multi-clip sample should be 7 seconds or less. Yes, they have gotten shorter over the years. If an experienced industry insider is still listening after a few seconds, you must show them what else you can do. Hook them with the first three syllables and first three seconds, wrap up, pull them into the second clip. An exception might be if the first clip shows a lot of range within it, but insiders still think “I get it, what’s next?” after a few seconds. Shorter is better.
You may have one clip after the first one that is a little longer, and the occasional alternate clips can be as short as 1.5-3 seconds, but rarely two short ones in a row.
2.2 Overall Maximum/Minimum: If you are new, we suggest providing 1, 3 or 5 clips in total. Providing additional, worse clips can cause someone to like your work based on your first, best clips, then dislike your work based on later, worse clips! Expected total length should be in the vicinity of:
- One clip = 5–10 seconds
- Three clips = 11–23 seconds
- Five clips = 18–40 seconds
- 7–9 clips = 55-65 seconds
A recent survey of pros found their demos averaged 61.1 seconds in length, and the average total number of tracks was 6.7. So a FULL commercial demo is typically less than 65 seconds. As long as a demo is not over-long, shorter than :55 is not necessarily an issue. If your resume does not mention significant recent voice over work, your demo is not expected to reflect work that you have done and it is understood that you are introducing yourself to the industry. Some talent who’s demo consists of national work they have done sometimes have longer demos.
2.3 No space/No silence: No noticeable silence or sound effects between tracks. No space between clips, or less than 1/20 second.
3.1 Clip must contrast with the one before and after.
Contrast simply means that two clips in a row don’t seem the same. BUT! Use your best, most authentic performances. Don’t simply plan “variety”—use the highest quality acting from your performances/recordings.
Solving the problem of stringing together several clips with contrast between each is only partly a “variety” problem. Contrast can be created by adjusting clip order, careful choosing of clips within each performance, doing wild takes after quality is achieved, highlighting less-identical qualities of similar scripts, music choices that bring out the differences between two performances, etc.
However, if there is sufficient difference between the clips, specific similarities can be overlooked. They need to FEEL different, not necessarily follow exact rules. But, here are the rules for achieving CONTRAST:
3.2 Category (topic type)
Avoid two in a row about cars, makeup, healthcare, etc. In general, you should only have ANY topic once or twice overall, three times max. However, if we can NOT tell from the words chosen what category the clip is, it doesn’t matter where you place clip as far as category is concerned.
3.3 Emotional style
First, avoid stylistic repeats, such as avoid two energetic in a row, two serious in a row. If there are other significant differences between styles, this is allowable, however.
But mainly: YOU need to sound like you are talking about different topics, sharing different emotions, not identical topics/emotions only with different words. This is tough for new talent, you will tend to sound the same on everything until you get better.
3.4 Music
The style and energy of music needs to contrast from clip to clip.
4.0 Purpose of Music:
4.0.1 Emotion and Story. To add emotion, increase it, clarify it. Music must be loud enough to add an emotion but not so loud as to dominate the voice over. Often best if there are some musical transitions (not strictly necessary) to add a sense of story.
4.0.2 Contrast, Mood and Genre.
Contrast: Music can make similar clips seem different. This is most beneficial when clips are sequential (back-to-back), to provide contrast between them.
Mood and Genre: Music can help the voice better match the intention of the script (e.g. “upbeat mood”, or “corporate genre”), and can make similar clips show different things. Imagine two reads that are both “warm serious”: one can be made to have a serious mood, the other a warm mood, showcasing different things your performance is good for.
4.1 Style:
(Also see 4.0.2 “Mood and Genre” above). Music must be of the type commonly used in commercials. Go here for music suggestions or go here and adjust mood and genre selections in left column.
4.2 Blend:
(Also see 4.0.2 above “Contrast”). Music should not take attention away from the voice too much, but still add emotion. For example, music with a strong, loud beat often doesn’t work well with voice (though you could go through and quiet each beat manually in post-production, this is usually not recommended).
4.3 Fade:
It is not necessary as a rule to fade music in or out, though sometimes it will not work unless you do.
4.4 Begin/End:
No music before or after voice. Details:
4.4.1 Beginning
1/10 prior to voice can be okay, but is rarely necessary unless trying to improve the blend with the previous take.
4.4.2 Ending:
First, try it with no fade. Try ending music before voice, as well as approximately ending the same time as the voice. If using a fade, first try having it end before the voice—having only voice at the ending. This helps highlight the voice, and generally makes connecting to the next take easy. If fading out after the voice, try having it overlap with the next take—having the next take start while the previous take’s music is fading out.
4.5 MP3 FORMAT:
Any audio format you care to submit in is usually fine. Submit by email. There is no expectation that you provide an ultra-high quality format. The sample demos above, for example, are in MP3 variable bit rate mode, with fairly low quality settings—set to vary from 65-105 kbps. (What this means—variable—is that where needed the quality will be a maximum of 105 kbps, but as low as 65 kbps if the algorithm “decides” a portion of the audio will sound adequate at a lower quality setting.)
Performance Quality
1. Vocal Delivery …click a tab above to learn more
Check your pronunciations!
Be a master of these commonly mispronounced words. Regularly type in a word you want to learn or confirm into a search engine with pronounce, e.g.
“pronounce Anonymous” (example search result)
Group words together into clumps. Don’t space them all out from one another.
This is what we call a cadence issue: We speak naturally in clumps of words. Well-known example: “Know what I mean” sounds like “no-whuta-meen” in common speech.
Speak in groups of words! Sometimes called chunks, clumps, chains, etc. Neither just “run on” nor isolate your words. After the beginning of a sentence, no individual word should ever be isolated from both the word before or after it. ALL words after the beginning of a sentence are part of a “clump” of two–five other words.
Speaking in groups of words is a gentle, natural thing. Relax. Take 3-5 breaths before you speak. You don’t have to consciously choose which words go together with other words unless you’re having problems.
This does NOT mean you should have bad articulation, but words must blend together as they do in natural speech.
ALL American English voiceover is made up of groups of 2-5 words. Ocassionally the first word in a sentence “stands alone”, and ocassionally but rarely a clump that is ALL very short words may stretch to 6 words.
Spacing out sentences/phrases from each other with long pauses is the same problem. Ideas connect and flow in natural speech. Sentences shouldn’t feel like individual performances recorded separately, voiceover is not performing lines in a poem.
Example Script Grouping: “Studies indicate kids who learn music excel in reading, science and math.“
It should NOT sound like you’re rushing to the end of the sentence “Studies-indicate-kids-who-learn-music-excel-in-reading-science-and-math.” Avoid the feeling of of a run-on sentence.
Here is an one possible grouping: Studies indicate—kids who learn music—excel in reading—science and math. This does NOT mean add pauses! It means that “studies indicate” should flow together slightly, and between “indicate” and “kids” it should not flow together quite as much.
Also, do not isolate words for emphasis. It should not, for example, sound like “Studies indicate Kids. Who. Learn. Music. excel in reading, science and math.”
You must articulate accurately, but still sound relaxed and natural.
Example Script: “I am going to downtown.”
Relaxed speech version: “I’m goin’ tuh downtown”.
The trick is to make the cadence and emphasis FEEL like “I’m goin’ tuh” but actually articulate all the pieced accurately. When you try too hard, it sounds like “I. AM. GO-ING. TOO” Be accurate, but sound relaxed and casual.
Although it’s generally a bad idea to OVER-articulate while performing, you WILL inevitably notice some things that are not perfect. When you’re newer, it’s likely that 90% of what you notice on repeat listenings will need fixing—and probably one or two things you don’t notice.
Listen carefully for any syllables or sounds / phonemes that might be less than perfect. For example, make sure there is enough “oo” sound when you speak the word “to”. Keep the “oo” in to very short but it’s not an “uh”/schwa, it’s an “oo” sound.
To linguists, the shortest sound that is a part of speech is called a phoneme. There are just 44 phonemes in English—44 different sounds that we use to make all the sounds of all the words in English.
These 44 “mouth moves” can be pieced together to create every spoken word. In talking about phonemes (vs. just letters), we put them inside slash marks, e.g. /t/. (English phonemes are represented by the letters of the alphabet individually and in combination.)
However, a particular phoneme can and often does sound different depending on the phoneme before and after it, and can and often does sound different when it is stressed vs. unstressed vs. overstressed vs. overlooked!
Easiest way to start to fix most accents: SHORTEN VOWELS on accented words.
This is true for all “rural”-type accents (Minnesota, Greater Appalachia, Southern, etc.). Outside urban areas, speech is more relaxed, sounds are drawn out, everything takes a little longer. City dwellers are in a bigger rush, generally.
So how is speech slowed down? Mainly vowels. Shorter, punchier, sharper “staccato” sounds (the “k” sound, for example) can’t be easily stretched and so are sometimes skipped or softened. Slower, more “legato” vowel sounds are easily drawn out, however. In fact, often shorter, punchier vowel sounds (think of the “i” in “it”) are mispronounced to make it possible to stretch them out and slow down speech.
The hardest thing to fix when slowing down a sound is the length of syllables has changed: the RHYTHM (stress/ cadence) of the word has changed. So first you must concentrate on feeling how the RHYTHM (stress/ cadence) has to change. And the first step is shortening vowel sounds on words that have a rural accent, such as the Minnesota “o” in, e.g. “Oooh yaah”.
Mic Technique
The basic skill of mic technique is not moving too much left or right while remaining loose and free overall. Practice!
Take a closeup video with the camera only 1-2 feet away of the space between the mic and your head as you perform from time to time. If you’re moving around too much, you’re probably not aware of it. “Freezing” in position in front of the mic is just as bad—it will make you sound stiff and fake.
Keep breathing!
If you stop or hold your breath, you will sound like you are READING, not TALKING. You are paid to talk, not read. Relax a bit on the last vowel or m/n in each clump of words so it extends slightly. (M/N: consonants that you hum, technically “Pulmonic Nasal consonants”).
Take two extra breaths before speaking sometimes, and concentrate on the pause at the end of the breath—the ‘space’ after you are done exhaling, but before you begin inhaling.
If you are thinking about your breathing when you are performing, your performance will be bad. Quit worrying about it! You can always edit breath sounds afterwards if they bother you.
PITCH: Inflection. New talent often intentionally inflect, or inflect so much they sound fake or sing-song or like “cliched radio DJ” or presenter. Most pitch changes should NOT be intentional or over done.
HIT: On the stressed syllable of a word (or the whole of a single-syllable word), speeding and pitching up slightly with NO extra volume (no punch) is called a “hit”.
A word pair is two words in sequence in the script, where the first word gives information (type or quality) about the second word, e.g. “daily routine”. You would hit “daily” as if you were thinking inwardly, “No, no, not ‘weekly’—’daily’.
LINGER: Emotional words or brand or company names should be lingered over a bit lovingly. It’s worth practing slowing down TOO much on words to develop the skill of intentionally lingering without it sounding fake or too short.
Avoid Recording when You’re Not Well
Speaking too much, too loudly, etc. (vocal abuse) are among the causes that alter vocal cords and result in disorders. From approximately most common to least common:
- Swollen vocal cords (laryngitis) from inflammation or infection vibrate differently, changing your sound.
- Where irritated cords touch, small, hard callus-like nodule pairs may appear on each cord. Sometimes called singer’s, screamer’s or teacher’s nodules.
- Small, soft polyp growths occur alone on a cord. Vocal abuse or long-term exposure to irritants, fumes, smoke, etc.
- Erosion sores (contact ulcers) are less common. Overusing sudden force when beginning to speak, such as some public speakers do is one cause. Learn to use gradually increasing, released force instead. Can also be caused by acid irritating the larynx due to gastroesophageal reflux disease (GERD), or heartburn bringing acidic stomach contents up the esophagus.
- Weakness and partial paralysis (paresis) means one or both vocal cords don’t open and close properly, changing voice quality.
- Paralysis means one or both cords don’t move. If both are stuck closed, breathing may be difficult. Causes of paresis or paralysis may include disease (Parkinson’s, MS, myasthenia gravis, etc.), trauma (from birth, surgery, head/neck injuries, etc.), infection, stroke, etc.
- Noncancerous cord tumors can be due to viruses or simply unusual growths (besides nodules or polyps).
- Cancerous cord tumors commonly causes by smoking or drinking alcohol. Life threatening if not caught and treated early.
What Creates Voice?
Voice is divided into modes, caused by muscle contractions, and affected by vocal disorders and anatomy.
Follow air up and out from the lungs:
- Breathing muscles (mainly the diaphragm and intercostal) move air from the lungs (subglottal area) into the windpipe (trachea). Lung pressure may be referred to subglottal pressure or tracheal pressure. From there, air moves to the…
- Voice Box (larynx): These “glottal” muscles modify airflow between lungs and mouth. The bottom of the box is the subglottis, the middle is glottis (vocal cords location), and the top (including tip-top epiglottis) is the supraglottis. Air there passes through the…
- Vocal cords (vocal folds): These two elastic bands of muscle sit side by side in the voice box. Closing them against one another and forcing air between them makes them vibrate (voicing). The cords and the opening between them are also called the glottis, hence “glottal” sounds originate there. Air leaves the fold area, and next moves past the epiglottis (flap that keeps food out) into the bottom of the…
- Vocal tract This is everything above the larynx, starting with the pharynx, ending at the mouth and nostrils. The seven parts of the tract are called articulators, studying the parts is called articulatory phonetics. Many complex muscles and muscle sets change the vocal tract shape. This area is sometimes called the supralaryngeal (“above the larynx”) system.
In Forced Breathing (hyperpnea), in addition to diaphragm and intercostal contractions, other accessory muscles must also contract:
Forced Inspiration: Muscles of the neck, including the scalenes, contract and lift the thoracic wall, increasing lung volume.
Forced Expiration: Accessory muscles of the abdomen, including the obliques, contract, forcing abdominal organs upward against the diaphragm. This helps to push the diaphragm further into the thorax, pushing more air out.
In addition, accessory muscles (primarily the internal intercostals) help to compress the rib cage, which also reduces the volume of the thoracic cavity.
Your Vocal Tract
You are likely already very familiar with all of these except for #2 and #4, so realize this is mostly already information you know.
Air passes through these parts in this order:
- Pharynx (“back of the throat”) The tube just above the larynx. Others can see the back of the pharynx when you open your mouth wide
- Velum / soft palate. Directs air to nose (if closed, all air goes to mouth). Tongue touches lower side of velum for K and G sounds (velar consonants).
- Hard palate “roof of the mouth”. Easy to touch with the tongue.
- Alveolar ridge is just behind top front teeth. Blends into the hard palate. Rougher than it feels, covered in ridges. Tongue touches here for t and d sounds “alveolar consonants”.
- Tongue. Sometimes diagrammed as tip, blade, front, back and root.
- Teeth extend from front, along sides, back nearly to the soft palate. The tongue is in contact with the upper side teeth for many speech sounds. Sounds made with the tongue touching the front teeth are called dental.
- Lips. Pressed together for sounds like p , b touch teeth for f , v sounds, rounded to produce the lip-shape for vowels like uù. Sounds in which the lips are in contact with each other are called bilabial, while those with lip-to-teeth contact are called labiodental.
Also, the voice box (larynx), Jaw and Nose are sometimes referenced partly as articulators.
Vocal Modes:
Some of the well-known vocal modes are:
- Modal or common
- Creak or fry
- Breathy / Stage Whisper
- Tense
- Harsh
- Whisper
- Falsetto
Whisper/Breathiness is the sound of friction from air turbulence (even with widely abducted vocal folds) at higher flow speeds in and above the larynx. Whisper is unvoiced (vocal folds not vibrating), breathy / stage whisper is voiced.
SYMPTOMS OF DISORDER:
Vocal cord nodules
- Hoarseness
- Low-pitched voice
- Breathy voice
- Singers may notice a loss of vocal range.
Vocal cord polyps
- Hoarseness
- Low-pitched voice
- Breathy voice
Contact ulcers
- Some throat pain while talking Possible hoarseness
- A voice that tires easily
Laryngitis
- A change in the sound of the voice, from hoarseness to croaking or complete loss of voice
If due to an infection:
- Fever
- Throat pain
- Malaise
- A feeling of having to clear your throat
Vocal cord tumors
- Hoarseness
- With large tumors, possibly trouble breathing or swallowing
Vocal cord paresis
- Hoarse
- Breathy
- Change of pitch
- Unable to get louder
- Discomfort from the strain of trying to move paralyzed cords
- Possible breathing difficulties
3. Acting …click a tab above to learn more
Talk, Don’t Read
When you’re new to Voiceover, “reading compulsion” is a problem. It’s the number one reason you stumble when saying things that would normally be easy for you. Psychologically, you feel “rushed”, and even if you’re not speaking quickly, it FEELS too fast.
Feel Relaxed, Not Rushed
It’s as if your brain is pulling words in through your eyes, and you feel you have to keep pushing them out through your mouth to keep up. Remember to breath naturally, and break sentences into short chunks of words.
Group words together into clumps. Don’t space them all out from one another.
This is what we call a cadence issue: We speak naturally in clumps of words. Well-known example: “Know what I mean” sounds like “no-whuta-meen” in common speech.
Speak in groups of words! Sometimes called chunks, clumps, chains, etc. Neither just “run on” nor isolate your words. After the beginning of a sentence, no individual word should ever be isolated from both the word before or after it. ALL words after the beginning of a sentence are part of a “clump” of two–five other words.
Speaking in groups of words is a gentle, natural thing. Relax. Take 3-5 breaths before you speak. You don’t have to consciously choose which words go together with other words unless you’re having problems.
This does NOT mean you should have bad articulation, but words must blend together as they do in natural speech.
ALL American English voiceover is made up of groups of 2-5 words. Ocassionally the first word in a sentence “stands alone”, and ocassionally but rarely a clump that is ALL very short words may stretch to 6 words.
Spacing out sentences/phrases from each other with long pauses is the same problem. Ideas connect and flow in natural speech. Sentences shouldn’t feel like individual performances recorded separately, voiceover is not performing lines in a poem.
Example Script Grouping: “Studies indicate kids who learn music excel in reading, science and math.“
It should NOT sound like you’re rushing to the end of the sentence “Studies-indicate-kids-who-learn-music-excel-in-reading-science-and-math.” Avoid the feeling of of a run-on sentence.
Here is an one possible grouping: Studies indicate—kids who learn music—excel in reading—science and math. This does NOT mean add pauses! It means that “studies indicate” should flow together slightly, and between “indicate” and “kids” it should not flow together quite as much.
Also, do not isolate words for emphasis. It should not, for example, sound like “Studies indicate Kids. Who. Learn. Music. excel in reading, science and math.”
A serious business-to-business spot is in most cases not the place to demonstrate that you can do a happy chuckle.
The three main voiceover qualities are sometimes said to be Serious, Warm and Mischief. Additional qualites include Wise (Serious +Warm) and Happy (Warm +Mischief). Give some thought as to which of these five qualities each clip should most convey.
To generate a style, do NOT try to fake a “sound” concentrate on voice acting via:
- Your Body Language
- Scene (what friend are you talking to?)
- Energy before you start (e.g. jumping up and down vs doing relaxed breathing)
Have Conviction
Conviction is needed in every spot—it’s the point-of-view of “this matters”.
A great shortcut is to treat the topic as if it is black or white. Polarized. Not necessarily important, but definitely having NO gray area.
That something only has a right and a wrong—no discussion, no gray area—makes it polarized EVEN if it is not particularly important. This is the easiest way to bring conviction to your spots.
“Be in the moment. Period. Just be there. Because if you get all like, ‘Oh I got to do this big thing.’ It just never works. It just doesn’t work. You’ve just got to let go. If it happens, it happens. If it doesn’t, it doesn’t. Whatever you do is ok, just be truthful, honest, real, and that’s all you can ask for.”
– Robert De Niro
Sounding the same all the time is a tough not to do when you’re new.
Tip: Rank your performances by authenticity—only use your best acting. Don’t just try to “sound different”—you’ll simply sound fake and end up using your worst acting instead of your best by trying for “variety”. You should “cheat” on this a bit by concentrating on having contrast between your takes on your end product (scroll up to “‘Contrast’ defined.”)
SCRIPTS
You don’t want to use over-used scripts (old scripts found all over the internet), iconic scripts (everybody-knows-them famous, like the “most interesting man in the world), or scripts that are too old.
An easy way to get appropriate scripts is to listen to voice over demos, find talent who are similar to you, and transcribe the spots you think are the best fit for you. Listen to talent at LA and NY talent agencies and you are most likely to be listening to fresh scripts. You can change dates, places, product names—whatever you wish when editing scripts that you transcribe.
MUSIC & PRODUCTION
It needs to sound like music that has been used in a commercial. The easiest way to find and license this kind of music is to search Audioblocks music by combining moods and genres, and a sign up for a cheap one-month Audioblocks membership to license and download all the music you like. Listen to clips of yourself on repeat while you listen to various music options to determine what might go best with your chosen voice over performances. Use a free browser plugin such as Volume Master so you can turn the music volume up or down while it plays in your browser and only download the music that you like best.
PRODUCTION: Less is more! Do NOT show off production skills at all, that is one the most obvious signs of a non-professional commercial demo, or that you have a radio production background. Yes, I have had agents specifically call out over production as a reason to not continue listening! This is about your voice, not the production behind it.
HOME STUDIO QUICK FIX
If your home studio isn’t quite as good as you’d like, be sure you limit how much your voice echoes back to the microphone by making sure your mic is pointed at the quietest portion of your space. For example, that means if you put acoustic baffling in a corner, stand in the corner and face OUT, so the microphone is pointed INTO the corner. If you face the corner, the microphone will be pointed behind you into the noisy room!
Voice Capture Box. Everyone should do this: Put some sound deadening material (e.g. a towel or blanket) in a shallow box, put your script in the box, and put the box on your copy stand. That way your voice will be partly deadened before it can echo around the room because you are speaking into the box.

Get Your Demo Evaluated
Because many people ask for demo evaluations, if you want us to evaluate your demo, your demo clips MUST follow the rules. We do evaluations at a very, very low cost, but since most people do NOT follow the rules before sending a demo, we charge $15 for a step 1 preliminary evaluation— 1️⃣ click here to order a preliminary evaluation, (but first read this page) which takes 1-3 days, but often much faster.
After receiving your preliminary evaluation, if you bring your demo into compliance (or if it is already in compliance), step 2 is a summary evaluation. 2️⃣Click here to order a summary evaluation for $10. This will touch on your brand voice and money voice, point out performance flaws and how to fix them, and give reasons and suggestions for improvements as well as provide an overall rating. If you did not order a Step 1 preliminary evaluation first, you will be refunded and given a preliminary evaluation instead. (If you want detailed followup such as a detailed practice program, production or music-matching tips, we can provide that as well for an additional cost).